Laser Etching & Craft · Guide
Custom Branded Drawstring Bags: Leather Patches, Materials, and What Lasts
How custom drawstring bags get branded — laser engraved leather patches vs printing, which bag materials hold up, real costs, and how to order a small batch.
By Robert Anthony · · 9 min read
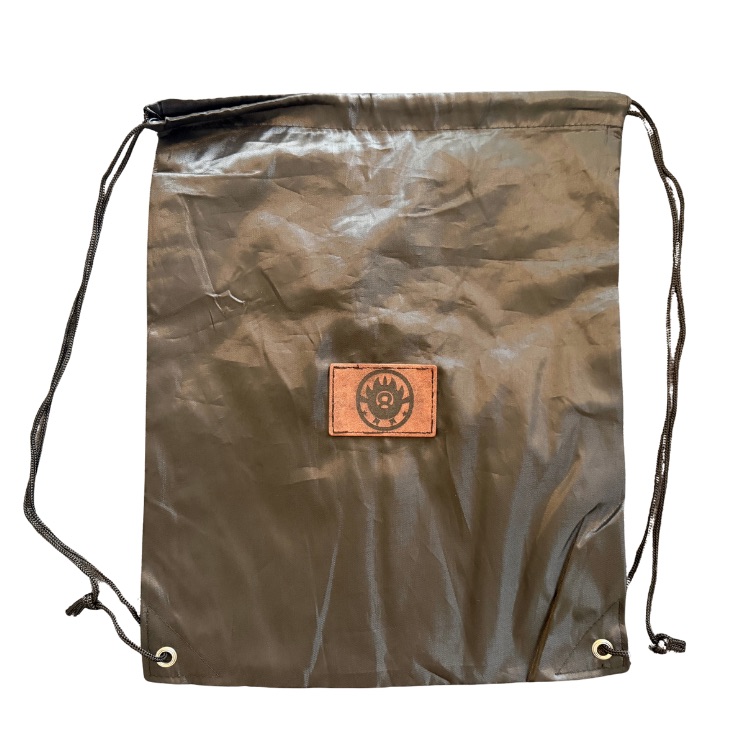
A drawstring bag is one of the most useful branded items a small business can hand out. It costs less than a hoodie, it gets carried in public instead of sitting in a drawer, and it takes a mark well. The photo above is one of ours: an olive cinch bag with a laser engraved leather patch on the front panel. This is how those get made, what materials actually hold up, and what a small run really costs.
Why a patch instead of a print
Most cheap promotional bags are screen printed or heat pressed directly onto the fabric. That works, and it is inexpensive at volume — but the ink sits on top of a coated nylon or polyester face, and coated faces are exactly where ink cracks. After a season of being stuffed, cinched, and thrown in a trunk, printed logos flake at the fold lines.
A leather patch behaves differently. The mark is burned into the hide, not laid on top of it, so there is no layer to crack or peel. The patch is then sewn or riveted to the panel, which means the branding is a physical object attached to the bag rather than a coating on it. It also reads as made rather than printed — the difference between a giveaway and something a customer keeps using.
What the laser is actually doing
On vegetable-tanned leather, the beam removes and darkens the top layer of the hide, leaving a recessed, coffee-colored mark with clean edges. The contrast comes from the leather itself, not from added pigment, so there is nothing to wash out. Chrome-tanned and finished leathers engrave lighter and less predictably, and bonded or PU 'leather' can melt and smell awful. Vegetable-tanned is the right default.
We break down the settings, hide choices, and edge finishing in more depth in the leather patches guide. If you want the general case for why an engraved mark outlives a printed one, that argument is in why laser etching lasts a lifetime.
Bag materials: what holds up and what does not
- 210D / 420D polyester — the standard cheap cinch bag. Light, water-shedding, fine for events and swag. Corners blow out first; look for reinforced grommets at the bottom.
- 600D polyester or ripstop nylon — noticeably tougher, still light. The best value for something people will actually reuse.
- Coated nylon (the olive bag above) — a soft matte face with a water-resistant backing. Takes a sewn patch cleanly and does not fray at the stitch line.
- 10–12oz cotton canvas — the premium option. Heavier, holds shape, ages well, and a leather patch looks best on it. Costs two to three times a poly bag.
- Non-woven polypropylene — the grocery-tote material. Cheapest per unit, but it delaminates and it is not worth putting a hand-made patch on.
Two details matter more than the fabric: the cord and the corners. A flat woven cord is easier on hands than thin round cord, and metal grommets at the bottom corners are the difference between a bag that survives a year and one that tears the first time it is overloaded.
Attachment: sewn, riveted, or glued
- Sewn — a box or perimeter stitch through the patch and panel. Strongest, cleanest, and the only method worth using on canvas. Requires a machine that can handle leather, or a local sewer.
- Riveted — four rapid rivets at the corners. Fast, industrial-looking, and permanent. Good on heavy panels, but the rivet backs sit inside the bag.
- Adhesive-backed — peel-and-stick patch backing. Fine for a prototype or a soft-goods item that never gets washed, but it lifts at the corners eventually. Do not sell it as permanent.
Getting your logo ready
Engraving rewards simple, high-contrast art. Fine gradients and thin hairlines disappear into the grain. Practical rules:
- Send vector art (SVG, AI, EPS, or PDF) whenever possible. A 300dpi PNG on a transparent background is a workable fallback.
- Keep line weights above roughly 0.5mm at final size — a 2in patch is small, and hairlines vanish.
- Design in solid black on white. Color has no meaning to a laser; it only matters as darkness.
- Skip drop shadows, glows, and photographic fills. Silhouettes and bold linework engrave beautifully.
- Inkscape is free and does everything needed to clean up or trace a logo; GIMP handles raster cleanup.
If all you have is a business card or a JPG off a website, that is usually still enough — a trace and a cleanup is a normal part of the job.
What a small run costs
Rough, honest numbers for a US small-batch order, not a container from overseas:
- Blank bag: $2–$4 for poly, $6–$12 for heavy canvas, depending on quantity.
- Leather patch: roughly $1.50–$3 in material and engraving time per 2x3in patch.
- Attachment: $2–$5 per bag sewn, less if riveted.
- One-time art prep: often free for clean vector files, otherwise a small setup fee to trace and test.
That lands a genuinely nice branded canvas bag somewhere around $12–$20 each at small quantities — more than a printed poly giveaway, and a completely different object. For teams, wedding parties, gym memberships, and shop merch, the reuse rate is what justifies it.
Who these actually work for
- Gyms and clubs — members carry them weekly, so the logo travels.
- Small breweries, coffee shops, and boutiques — a patch bag reads as merch you can charge for, not swag you give away.
- Sports teams and schools — cinch bags are already the default for cleats and gear.
- Wedding and event favors — a patch with a date is a keepsake; a printed one is not.
- Makers packaging their own products — a branded bag doubles as packaging and as advertising after the sale.
Ordering a batch
We make these in-studio in Vacaville, California, alongside our coasters, dog tags, and patches. Send a logo — even a rough one — and we will send back a proof before anything gets cut. Pricing and the rest of our etching work is on the services page, and finished pieces are in the shop.
If you would rather make them yourself, that is a completely reasonable path too. Start with how to get into laser etching for machine choices, then the leather patches guide for the material specifics. Free business-side help exists as well: SBA courses and SCORE workshops cost nothing and cover pricing and licensing.
Keep reading
Laser Etching & Craft
Laser Engraved Leather Patches: How They're Made and Why They Last
A studio look at laser engraved leather patches — how the burn works, what leather does under the beam, and how to spec patches for hats and jackets.
Laser Etching & Craft
How to Get Into Laser Etching: Machines, Software, and a Real First Year
A practical guide to starting laser etching — diode vs CO2 vs fiber, honest machine picks by budget and purpose, free open-source software, and safety.
Laser Etching & Craft
Why Laser Etching Lasts a Lifetime: The Craft Behind a Permanent Mark
How laser etching bonds a design into metal, wood, and stone — why the mark outlasts ink and paint, and what to look for when you order a piece that should last.
Laser Etching & Craft
Boutique Laser Engraving Studios: Why Small Shops Do the Best Custom Work
What a boutique laser engraving studio actually offers — smaller runs, real proofs, tighter design work, and pieces you can't get from a big print-on-demand shop.